
I also watched the Trilian Masterclass which was equally as useful, and wrote a load of notes as standard. As they are both spectrasonics products and have a similar setup i was hoping the tutorials would cover different ground and i think they do. Or at least my notes should do.
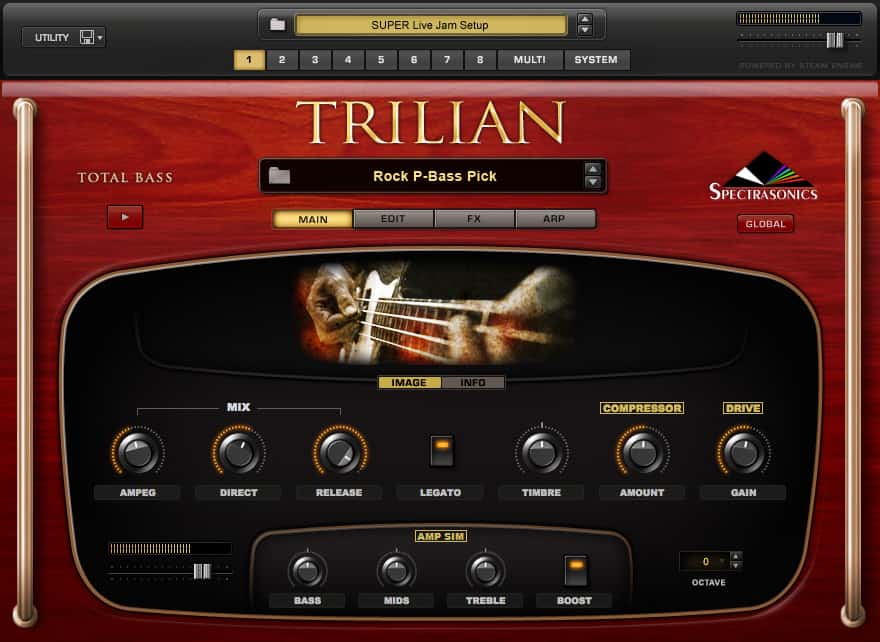
Multis
Top browser loads multis and the below browser loads patches.
Each multi can have up to 8 parts which can each have 1 patch.
Zoom windows give more info about the multi or patch.
The multi browser allows us to filter the options by Type of performance, Model that was recorded and Technique
Keyswitching technique allows us to select the articulations / parts by using the bottom 8 notes in live mode.
You can change the controls on each of the parts main and edit page.
Live mode
Soundsource most or all note pitches were recorded and mapped across the notes, with each pitch was recorded multiple times at multiple velocities
Playing same notes normally sounds like machine gun effect. But and on trillian (plus sustain pedal pressed down) it activates round robin samples which are multiple versions of a single note pitch and strike intensity.
You can select Sequential, Random, Random Full Cycle option
The articulations in the full part of the multi also include legato release notes, which add realistic hammer on / off legato notes to notes that are next to each other on the keyboard. Only one note at a time can play, unlike all the other notes which can be played together. Legato function only happens when overlapping sustained notes are a half or whole step apart.
You can turn this legato function on the main page, and on the edit page in the soundsource zoom special articulations section.
Use legato soundsources on/off & the Release key tracking on/off.
Also a set of release notes (sounds of fingers coming off the string), and are triggered with midi note off messages. The volume is controlled with the release level noises and is also on the main page with the release volume rotary.
Live Mode
Keyswitching Mode - Parts are selected by holding down keys the lowest keys on the keybaord. This is set to E1 to A#1 by default. If your host sequencer shows E1 as E0 you can change this in the live mode zoom window with the key select display format window
.
When playing already sustaining notes will not be cutoff by switching to different part.
To learn a part you can ctrl / right click and select midi note learn. You can also select unlearn to delete the previous mapping, or show learns to show what note or cc number it is currently mapped to. The Main part (Part 1) is always reverted to after the key switching notes have been released to enable the articulations to be easily played. We can see how this is done by looking at Show learns. It shows that the other notes are all inverted. Therefore when they are not being pressed Studio funk will be selected which is incredibly useful if you have one part you normally play. Learn inverted to have a part turn off upon reception of the specified midi message. Any number of midi learns of any type can coexist for any single part in live mode.
The default mode for Trilian is Switch Mode with is different from Omnisphere. In Switch mode the part is only active when the keyswitch is depressed and the part is turned off as soon as it is released. This is reversed for any parts that have inverted learns.
In Touch mode turns off the current part when a new one is selected. Any keyswitching clears the slate and any previously selected parts are de-activated. The exception is when a part is inverted, as in this example, the main part is switched on each time a key is let of, so you actually have 2 parts at once. With keyswitching you can press two keys at once to play both sounds, but in cc mode pressing 2 ccs will only play one of them. In cc mode you can use either toggle or momentary switches as Trilian responds to both the same.
In Latch mode parts are toggled on off independant of each other, so that parts can then be layered on top of each other. Selecting latch mode in keyswitching allows you to perform or layer parts in the mix. With CC's this is useful for my LPD8 which has 8 pads and means i don't have to hold down the button which frees up both hands. Both have their uses but remember that when using cc controls, that you need to select either toggle switch (sends a value of 0, then 127, with each press) or momentary switch (Sends a value of 127 each press and 0 when let go) to get the desired effect with each mode.
Soundsource Mix & Articulations
At the heart of every patch are the soundsource Multi samples, which
sample each note, and each note has been sampled on multuple strings, on many strike intensitites. There have been round robin variations sampled, and muliple notes have been sampled for legato performance and release noises.
Duplicate of all the above 2x : every sample has been recorded both direct and with a microphone.
The acoustic bass was recorded simultaneously on 4 channels
Acoustic 1 uses a Neumann Tube 147 Mic, paired with a wilson pickup to deliver a more warm, sustained type sound.
Acoustic 2 uses an AKG c12 mic, paired with a Schertler pickup, emphasizing the attack, which is designed for faster / busier styles.
Release Noises & Legato Samples are less prominent in the pickup (direct layer). When turnning up the mic it really brings out the release noises and legato of the sound.
Play legato and scale-wise to trigger the samples in the legato special articulation layer.
The Soundscource mixes of the mic and direct pickup, and the legato, & release noises are all in the zoom page as well as the front page, but the transition time slider which controls the transition time from the normal samples to the release samples at the end of each note.
Stack Mode
Multi modes stack and live are mutually exclusive, e.g Turning on stack mode, turns off live mode.
When switching to stack mode all the loaded patches in the multi are playing together. You can delete these by clicking on the patch number and in the utility menu selecting delete part.
In the stack grid you can ctrl / right click on a part and select remove to remove. You can also select add to add, which is important as loading a patch into an empty part wont load it into stack mode automatically.
When active Stack mode (like live mode) overrides, the midi channel to receive assignments in the multi mixer.
The yellow bar shows the momentary value of the element selected as the Stack Mode Controller
Midi Note #
Midi Controller
Note Velocity
Layering and velocity cross fading - Instead of notes you can select the velo(city) tab, to make higher velocities select the patches, or cc controller to select.
With stack mode you can easily layer patches or crossfade between sounds with midi ccs or note velocity.
Split switch save & update
Live mode keyswitching notes are indicated in red.
Unlearn a parts live mode note assignments to make those notes available to the stack when in note mode.
Use the parts ocatve control to enable the correct range.
Utility - save multi to save your creation
File Path - Trilian- Settings - Library - Multis - User - (Categorys Folders Here - You can add your own)
Folders within user folder show up in the categories column. You can create your own sub folder. (Categories)
When filling in the attributes, search looks for any text in the names, notes and keywords so be sure to fill it in with something useful.
ADSR & Amplitude Envelopes
The Contour of a sound's volume is shaped by the Amplitude Envelope, and is the most fundamental shaper of a sound. Each patch layer A & B has its own AMP Envelope
Attack Time to go from silence to maximum volume
Decay Time it takes to go from maximum volume to the Sustain Value. Sustain value must be lower than the decay to hear any difference and the note must be depressed throughout.
Sustain - A volume level value not a time value. The sustain is a percentage of the maximum volume and will play for as long as the note is depressed.
Release Time - Time to fade and return to silence after releasing a note.
Hold Time - Follows Attack stage and is the time to sustain at maximum volume before starting Decay stage.
So an attack time value of 2 secs means it takes 2 seconds to get from silence to maximum volume. A Hold Time value of 2 seconds means the sound will play at maximum volume for 2 seconds. A delay time value of 5 seconds means it takes 5 seconds to get from maximum volume to the sustain level while the note is still being depressed. A sustain value of .35 will mean the volume will continue to play at 35% while the note is being pressed. A release time of 2 seconds is the time it takes for that volume to return to silence when the note is released.
Velocity Sensitivity - How much the Amp envelope is scaled/affected by note velocities.
Release Articulations - The release can be used for great effect for triggering and releasing sounds, but you can also use the any Trilian's Release Noise sample set articulations! So for a synth bass you could select an acoustic bass release articulation. Remember to raise the release level on both the soundsource zoom page AND the release time value on the Amp envelope, as very short release times in the amp envelope will cut off release noise samples. If using a slap bass articulation for example which could be very short, it will only play for a short time, although you will hear it. Increasing the release time will cause the sample to sound any longer after releasing a note when using the short articulations, it will just allow the articulation to be played in full. The live articulations really make playing synth bass with short notes a lot better, and if you need a long release noise you can raise the transition time on the soundsource zoom. Or choose No Release soundsource to have the Amp Env Release stage determine the fade time fully after note release.
Synth Soundsources in Trilian are based on multi sampled soundsources (from the original synths). Each of the samples has a portion of the recording looped - allowed to repeat endlessley during the sustain and release segments of the Amp Env. For the acoustic basses in Trilian Sustain Articulations do not loop so therefore cant sustain indefinitly. You can see this if you load up just the sustain part of an acoustic bass into the soundsource browser. For Electric basses some can sustain indefinitly although it is a lower volumes.
Filters
Filter
The loudest (and lowest) frequency band is the fundamental tone of the bass otherwise called the fundamental partial or harmonic. The upper partials are harmonically related overtones, which are higher frequency and have less energy, and give the bass its tone. The non harmonic elements are attack transients and give the bass its timbre.
Filters are fundamentally subtractive, lowering the volume or energy of specific frequency ranges.
The cut off determines which frequencies are to be lowered.
The envelope depth knob affects the automatic motion of the cutoff as notes sustain. Turned all the way down disables this motion.
Low Pass Filter Removes higher frequencies above the cut off.
Lowering the cut off all the way to the bottom removes all the high frequencies so that all were left with is the lowest fundamental tone.
High Pass Filter removes lower frequencies below the cut off.
Resonance boosts a small band of frequencies centred around the cutoff. The cut off can be static, or moved around with performance gestures using midi controllers, or with each note you play e.g using velocity.
When the cut off frequency conincides with an existing overtone Resonance will accentuate it, and allow us to hear the position of the cut off and it's movement.
Filter Envelope moves the cut off up and down each time a note is sounded and sustained. Sustain & Release are not available from the main page controls for most of the factory patches, so go to the edit page for the full controls of the filter envelope.
If the cut off of a low pass filter is very high / open, the filter envelope wont have an audible effect as its already open, so has nowhere to go.
Its also good to note that lots of people listen to music with earbud or computer speakers so dont filter out the higher partials if you want your music to translate.
Each filter is stereo and there are 2 filters per part which can be run in series or parallel. In parallel mode the mix slider becomes active and enables balancing of the two volumes from each of the 2 filters. The Gain slider creates changes in timbre when used in pre mode, and just changes in volume in post mode.
The offset controls on each filter are the same as the rotarys and are used to set the cut off, resonance and spread (pan amount) of each filter. Spread increasingly lowers filter cut off from Left to Right (or Right to Left))More info on filters in the other section, but the types of filter are really interesting.
Hi Pass can be used in series mode to lower the frequency of the lower freqencies
Band Pass lowers frequencies above and below the cut off. Notch filter does the opposite cuts a whole in the middle which you can move around with the cut off.
Metal pipe is a complex comb filter. Like the all pass on steroids. With the Metal pipe + being inverted.
All pass filter changes the phase of multiple frequency bands to create flangy / phasey sound which gets more nasal or vowel like with higher resonance. On a simple saw with a lpf and the all pass filter i was able to get something like tipper spunion vowel sound when using the glide.
Solo lets you only play one note at a time but allows the whole amp envelope through. If you add Legato with the adjacent L, the amp and filter envelopes to do not retrigger so each sound is connected to the next under one amp and filter envelope. This enables you to use your performance to shaper your sound and connect notes for that rubber band bass sound (with the note attacks removed) To get the attack character of the filter and amp envelopes just seperate the notes. This legato solo combined with glide legato reminded me of the plump djs squidgy saw bass.
Glide remembers the pitch of the previously played notes and glides up to the pitch of the current note in the amount of time set with the glide time slider. When Glide Legato is on, glide only happens when notes are connected meaning your performance can be more expressive.
Modulation
Modulation - changes an aspect of the sound over time. e.g glide, lfo, envelopes, etc.
Performance gestures - mod wheel, key strike velocity, aftertouch, pitch bend wheel, etc or
Built in envelope generators (contour each note) or Low Frequency Ocillators (LFOs)
LFOs are shared by / can affect targets in both layers in a patch
Random modulation source is a useful factory modulation but its initial depth is 0. Bring up the depth for variation of an assigned parameter (but keep it subtle when assigned to something like pitch)
Because they are samples of hardware synthesizer patches the synth soundsources in Trilian often have lots of modulation, shaping or motion already, meaning theres often not a lot left to do in Trilians edit page or fx options.
Velocity sensitivity is hard wired into lots of synth patches via the filter and/or anplitude envelopes and is a common way to add playable expression to patches.
On the main page are various modulation controls. You can see what the paramaters are assigned by right clicking and show all audio parameters. Someimes its just says depth but you can check by doing some detective work / looking in the mod matrix
Harmonia (under mult) is a sound shaping option at the soundsource level.
Mix slider controls the balance of the original and the 2 harmonia voices and is a good one to modulate (its often the detune knob on the main page). Each voice can be detune and pan control, and they can be transposed by semitones.
Sample start - determines at what point all samples begin playback when triggered, bypassing the initial transient, or an initial slow attack depending on the samples.
Start slider can remove subtle clicks if the sample start is not at a zero crossing. It can be modulated easily with flex mod.
Flex mox - Right / Ctrl Click on any parameter to assign a source to modulate it with lfo, envelope, velocity, wheel, etc. If you click on the invert button - as the source value rises the target value rises.
Timbre slider - when moved to the right it triggers samples from lower on the keymap and has to transpose them up to the correct pitch. Their formant regions / natural resonances are also pitched up with this transposition.
In short the timbre shifter is a way to shift formants up or down. Chimpunkinzation & Darth Vader-ization. Can be useful for live basses to add some variation with velocity.
FM - Frequency Modulation - A dedicated oscillator which modulates the frequency of the soundsource. The modulations are so fast we can hear them, but they cause generation of sidebands which are made up of Partials (additional tones) When the frequency ratio is an integer multiple shown by the markers on the fm slide, it creates harmonically related sidebands. When its not it generates clangourous noisy or gritty sounds which are maybe more useful in synth basses.
The frequency ratio between bass soundsource and fm oscillator determines the timbre / sideband content.
Key tracking keeps the frequency relationship consistent. If turn off we get a changing timbre with every note.
Automation is as with omnipshere - right ctrl click and either learn with midi cc, or enable host automation. One thing to note is that if you enable host automation for any control on the front main page then you will see custom instead of the parameter name in your daw. To see it's name automate a parameter in the edit page instead (as main page controls will just be moving an edit page control) You can still move the main page control and it will affect the named parameter just as if you enable host automation of that parameter from the front page, but it will also show the name of the parameter in your sequencer.
Arpeggiators
Turn on the arpeggiator and drag the yellow line across for how many steps you want e.g 16
Then set the duration of each step with the clock dropdown e.g 1/16 which would be 1 note for each of the 16 steps you've just drawn in.
Turn on the steps with the note on / off buttons and drag the velocity faders to set the velocities
To change the length of the notes global move the length knob.
To change indivudually - hold down the shift key and drag the yellow bars to the left or right. Dragging the length past the individual steps creates and ties a new note to it. Notes can be up to 3 steps in length at most.
Song position in trigger mode - position and sync information from your host ensures the first step in the pattern aligns with downbeats in your project. This is great if you want your arppegios to play through with your song.
Note trigger - restarts the arpeggio when any new note is played.
Legato trigger - restarts the arpeggio when any new note that is disconnected is played. Any notes that are connected will not restart playback and the pattern will contrinue to play,
The modes menu is the arpeggiators response to chords. Pretty self explanatory with the only real difference being the As Played mode which allows you to play the arpeggio a bit more. When holding down with a keyboard this is really interesting, but the other modes are really useful when you have a midi parts and only some steps playing and can be used to good effect with the octave and clock settings. Remember that solo mode or the number of voices will make chord redundant, and the octave buttons specify how many octaves the patterns will play for.
Adjusting the release stage on the amp stage helps to really tighten up the arpeggios.
Turning buttons off and back on again will reset the step durations but retain the velocities.
Automation of the global length is cool.
Customising Trilian & opening in Omnisphere
Custom controls can be seperated into 7 groups in the top row, but the bottom row is a fixced single group.
To create new groups - right click and choose Add a new group at upper far right. Or just grab the edge of the seperator line and drag it
Group name boxes can function as on/off switches.
To clear previous controls right click and select clear all parameter assignments for this..
To assign right click and choose assign this to next touched audio control. You can do this as many times as you like to select multiple audio controls to one custom knob
To rename group Right click and select enter group name
You can create your own custom controls for all used patches and then save to recall. This is really useful when mapping the controls to ableton as you can then pick them up with the novation if you save your mappings and patches / multis.
The entire Trilian library can be opened and manipulated in Omnisphere and combined with omni's soundsources. Trilian has the custom controls, but omni has a load of sounds and a couple of extra controls like waveshaper, ring mod and 4 harmonia voices.